Choosing the right hosting platform can make or break your website’s performance. For years, Cloudways has been a popular choice for managed cloud hosting, but a new contender, xCloud, is making waves in the hosting world.
Launched in January 2024, xCloud aims to simplify VPS hosting by offering a powerful control panel that lets you connect your own server or buy a fully managed VPS (partnered with Vultr). But how does it compare to Cloudways? Is it really a better alternative?
In this detailed xCloud Hosting Review, I’ll share my first-hand experience using xCloud, compare it with Cloudways, and help you decide which platform is the right fit for your needs. Let’s dive in!
What is xCloud.Host?
I first discovered xCloud in 2024, when they launched an early bird lifetime deal. I grabbed their 2-server deal for just $99, and since then, I’ve been using xCloud to manage all my websites.
To be honest, I’m not a server admin—I don’t have the technical expertise to handle VPS servers on my own. Initially, I thought managing a VPS would be overwhelming, but xCloud changed everything for me. It takes care of all the technical stuff in the background, making it super easy to manage both my servers and websites.
If you’ve ever felt intimidated by VPS hosting, xCloud is the perfect solution—it bridges the gap between powerful server control and user-friendly management!
When I first started my blogging journey with Cloudways, the experience was seamless. They took care of everything—from website speed and backups to security—making it an excellent choice for non-developers like me. I initially opted for the 1GB RAM plan, which felt reasonably priced considering the features and convenience it offered.
However, as my website grew and I needed to upgrade to a higher-tier plan (4GB RAM), I noticed a huge price gap between Cloudways’ pricing and the actual retail cost of a Vultr VPS. The difference was too significant to ignore, and at that point, the cost didn’t seem justified for the services provided. That’s when I started exploring better, more cost-effective alternatives—leading me to xCloud backed by WPManage Ninja Team, the creators of Ninja Tables, FluentCRM & Fluent Forms for WordPress.
This WordPress hosting and server management solution turned out to be a game-changer for me. Here’s my experience switching from Cloudways to XCloud.Host and why it’s the best decision I’ve made for my website.
xCloud Hosting

DK’s Rating:
xCloud is a hybrid hosting solution that combines a WordPress control panel with managed server hosting. It simplifies website and server management, making it ideal for bloggers, agencies, and developers.
Pros:
cons:
Why xCloud Feels Like a Hybrid Solution for Me
For me, xCloud isn’t just a hosting control panel—it’s much more than that. It offers the flexibility to connect your own VPS server or buy a managed server (partnered with Vultr) at retail prices, fully managed by xCloud. This means you can host your web apps or websites without worrying about the technical complexities of server management.
xCloud replaces both Cloudways and SpinupWP, bringing the best of managed cloud hosting and server management under one roof. It combines the ease of managed hosting (like Cloudways) with the flexibility of server control panels (like SpinupWP), allowing users to manage their servers and websites effortlessly—all in one place.
If you’re currently using DigitalOcean, Vultr, Linode, or any other unmanaged cloud server, xCloud makes life easier. You can simply connect your server and let xCloud handle all the technical aspects. Setting up a WordPress website becomes effortless—just a few clicks, and it’s ready to go!
Is xCloud Right for Beginners?
If you’re just starting your blogging journey, xCloud is not the right choice for you. Instead, shared hosting is a better option because it’s beginner-friendly and cost-effective. At this stage, you might still be figuring out what blogging is and why you want to start a blog. There’s a long learning curve ahead.
In your first 1-2 years, you’ll be focused on:
- Learning how to structure a blog post effectively.
- Understanding SEO (Search Engine Optimization) and how it impacts rankings.
- Improving CTR (Click-Through Rate) and user engagement.
- Mastering website design and content strategy.
- Developing a content marketing plan.
- Driving organic traffic to your blog.
- Collaborating with other bloggers in your niche.
- Creating sponsored posts to build authority and visibility on high-authority blogs.
During this phase, your priority should be producing outstanding content that helps your blog rank higher in Google search results and attracts consistent traffic. Only when your website starts receiving huge traffic will you need a high-resource VPS hosting solution like xCloud. Until then, shared hosting is the best option for new bloggers and content writers.
Who is xCloud for?
However, xCloud is ideal for:
- SaaS Developers – If you’re building a web-based solution to solve a problem, xCloud provides the resources and scalability you need.
- Website Developers & Designers – The white-labeling feature in xCloud allows web designers to streamline their business, offering a more professional and efficient experience for clients.
- Content Creators & High-Traffic Website Owners – Whether you’re managing multiple websites, creating viral content, or driving massive traffic from social media, xCloud ensures speed, reliability, and the resources needed for smooth operation.
If you’re looking for a hosting solution that can handle growth, performance, and scalability, xCloud is the way to go.
Pricing & Value – Which One Saves You More Money?
xCloud and Vultr Partnership – Flexible Server Options
xCloud provides VPS servers through its platform by partnering with Vultr. You have two options when using xCloud:
- Buy a VPS server directly from xCloud and launch it instantly.
- Connect your own server from another hosting provider if you prefer a different investment.
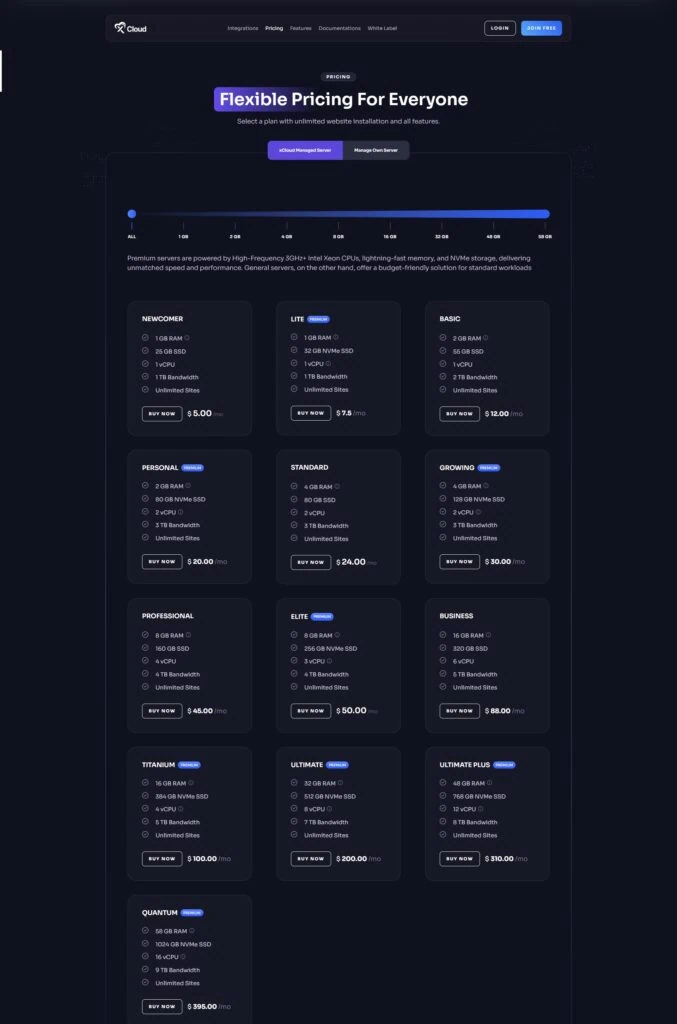
xCloud offers High-Frequency Vultr Servers, similar to Cloudways, which also provides High-Frequency and Standard-Frequency Vultr Servers. To help you decide, I compared the pricing of Cloudways and xCloud for similar servers in a table format so you can see the differences clearly.
|
High Frequency Vultr Server |
Cloudways |
xCloud.Host |
Price Difference |
|---|---|---|---|
|
Vultr 1 GB RAM, 1 vCPU |
16$ / Month |
7.5$ / Month |
8.5$ / Month |
|
Vultr 2 GB RAM, 1 vCPU |
30$ / Month |
12$ / Month |
18$ / Month |
|
Vultr 4 GB RAM, 2 vCPU |
60$ / Month |
30$ / Month |
30$ / Month |
|
Vultr 8 GB RAM, 3 vCPU |
118$ / Month |
50$ / Month |
68$ / Month |
|
Vultr 16 GB RAM, 4 vCPU |
173$ / Month |
100$ / Month |
73$ / Month |
|
Vultr 32 GB RAM, 8 vCPU |
270$ / Month |
200$ / Month |
70$ / Month |
|
Vultr 48 GB RAM, 12 vCPU |
334$ / Month |
310$ / Month |
24$ / Month |
|
Vultr 58 GB RAM, 16 vCPU |
405$ / Month |
395$ / Month |
10$ / Month |
xCloud vs. Cloudways – Cost Savings
If you switch from Cloudways to xCloud, you’ll notice a significant price difference—you can save a substantial amount of money by making the switch.
To take this a step further, I purchased Hostinger’s VPS KVM 4 plan (16GB RAM – 4 vCPU) for $12/month (when paid annually). In comparison, the same 16GB RAM – 4 vCPU plan on xCloud costs $100/month. By choosing Hostinger’s VPS, I reduced my hosting expenses by over 150%.
Most importantly, all my websites pass Google Core Web Vitals, which means they load fast, perform well, and meet SEO requirements. For me, that’s more than enough.
If your main requirement is raw speed and efficiency, then Vultr’s High-Frequency Servers might be the better choice. However, if you’re looking for ample storage, reliable performance, and significant cost savings, Hostinger’s VPS—combined with xCloud—can be an excellent solution. (Read My Hostinger VPS Review Here)
Once I purchased the VPS server from Hostinger, I connected it to xCloud.
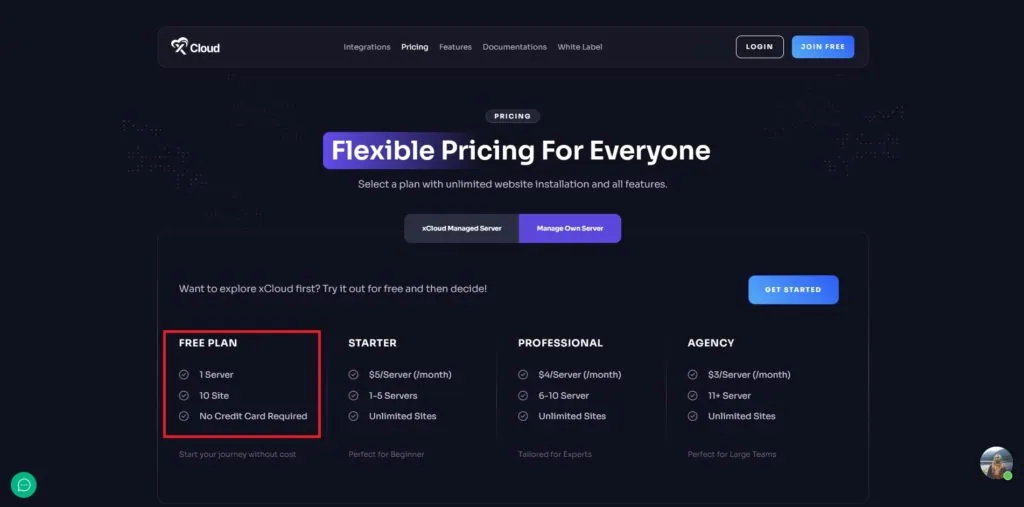
xCloud’s Free Plan – A Great Option for Bloggers
xCloud offers a free plan that allows you to:
For individual bloggers and content writers running content-based websites, this free plan is more than enough. Personally, I manage 3-4 websites on my own, and xCloud’s free plan meets all my needs perfectly.
If you’re a blogger looking to cut hosting costs while still leveraging xCloud’s features, this could be the ideal setup for you.
One of the best things about xCloud’s Free Plan is that you don’t need a credit card to get started. You can simply connect your VPS server and launch a WordPress website within minutes—completely free of charge.
This makes it an excellent option for bloggers and content creators who want to test the platform, set up multiple websites, and manage their hosting efficiently without any upfront costs.
My Experience with xCloud – Managing DigitalKarthik.com
My website, DigitalKarthik.com, is managed entirely through the xCloud Control Panel, running on a Hostinger VPS. This is my genuine experience, and I’m sharing it with you to give you an inside look at how xCloud works.
The image above shows the xCloud main dashboard, where you can access all the essential information about your hosting setup.
Key Features of the xCloud Dashboard
Xcloud.Host covers all aspects of server and site management through their control panel, aiming to provide dynamic and comprehensive control over server and website functionalities.
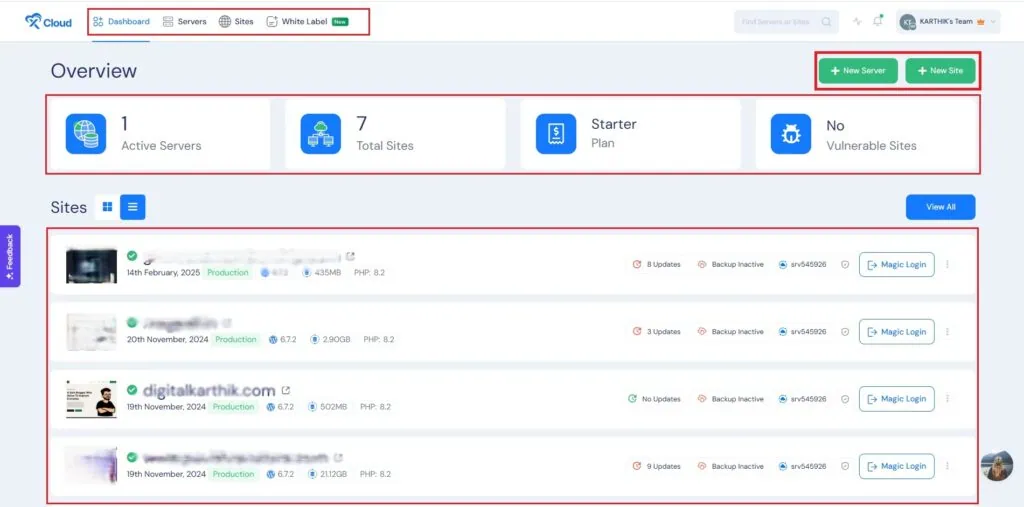
- Number of active servers
- Total websites hosted
- Your xCloud plan details
- Security insights (e.g., number of vulnerable sites that require immediate action)
- Dashboard (for an overview of your setup)
- Servers (to manage VPS configurations)
- Sites (to handle website-specific settings)
Server Management in xCloud
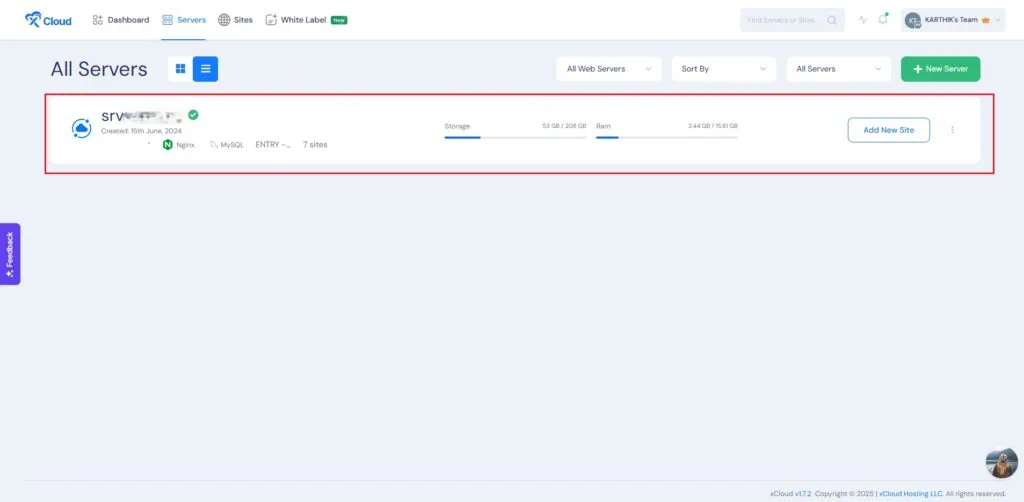
The Server section provides complete control over your VPS, including:
Launch a Server
To add a new server in xCloud, click the +New Server button at the top right corner of the dashboard.
Currently, xCloud makes it easy to connect servers from major cloud providers, including
- Vultr
- DigitalOcean
- Akamai (Linode0
- Hetzner
- Google Cloud
- AWS
You can authorize the connection directly or use an API token to link your server.
Connecting a Custom Server (e.g., Hostinger VPS)
In my case, I wanted to connect my Hostinger VPS. Since Hostinger is not natively integrated, I used the “Connect Any Server” option. When connecting a custom server, you’ll need to provide the following details:
🔹 Server Name
🔹 IP Address
🔹 SSH Username
🔹 SSH Password or Public Key
Important OS Requirement – Ubuntu Only
xCloud only supports Ubuntu OS and requires Ubuntu 24.04 LTS x64 (or the latest version).
If your server runs on Debian, CentOS, or AlmaLinux, you must switch to Ubuntu 24.04 or a newer version before connecting it to xCloud.
This can be a downside for users experienced with other operating systems. For example, when I was using Cloudways, I ran my servers on Debian OS, but xCloud requires Ubuntu. However, I understand why—Ubuntu is one of the most popular and stable operating systems, receiving regular updates and long-term support, making it ideal for both beginners and experts.
Personally, I’ve grown to love Ubuntu for its versatility and ease of use, and I now prefer it over Debian OS.
Choosing a Web Server in xCloud
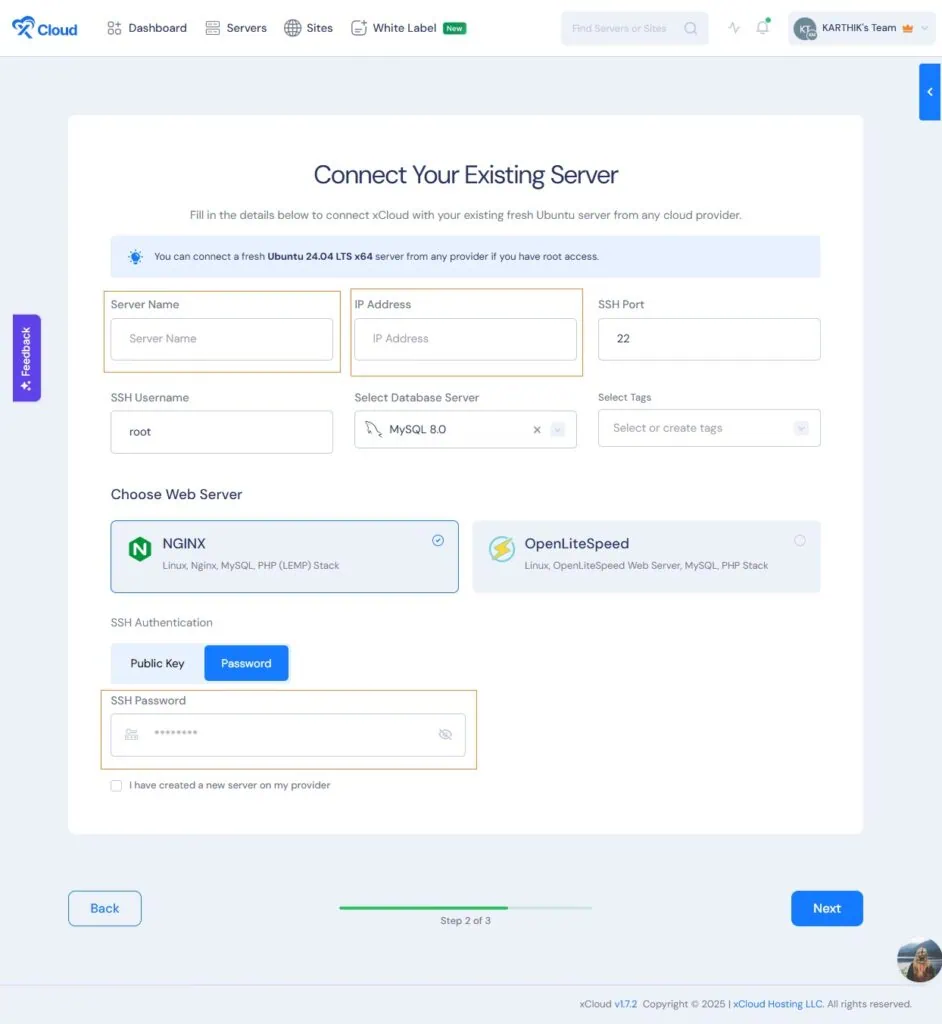
xCloud.Host allows you to choose which web server to install on your VPS:
🔹 NGINX (Nginx, MySQL, PHP) – Best for static websites, blazing fast.
🔹 OpenLiteSpeed (OpenLiteSpeed, MySQL, PHP) – Best for dynamic websites like membership sites or online communities.
I use the Nginx stack for my website since most of my content is static. Nginx delivers incredible performance for static websites.
However, if you run a dynamic website (such as a membership site, community platform, or an interactive web app), I recommend choosing the OpenLiteSpeed stack for the best performance.
Once you’ve filled in all the required information, xCloud automatically sets up your server within minutes. During this process, it:
- Installs the required technology stack (NGINX or OpenLiteSpeed, MySQL, PHP)
- Deploys essential scripts and configurations
- Optimizes the server for performance and security
With this automated setup, your web app or website is ready to run efficiently, making it faster and easier to manage without any manual intervention.
Once your server is set up, it will appear in the Server Section of xCloud. To access its settings, click on the server you added, and you’ll be taken to the Server Settings page.
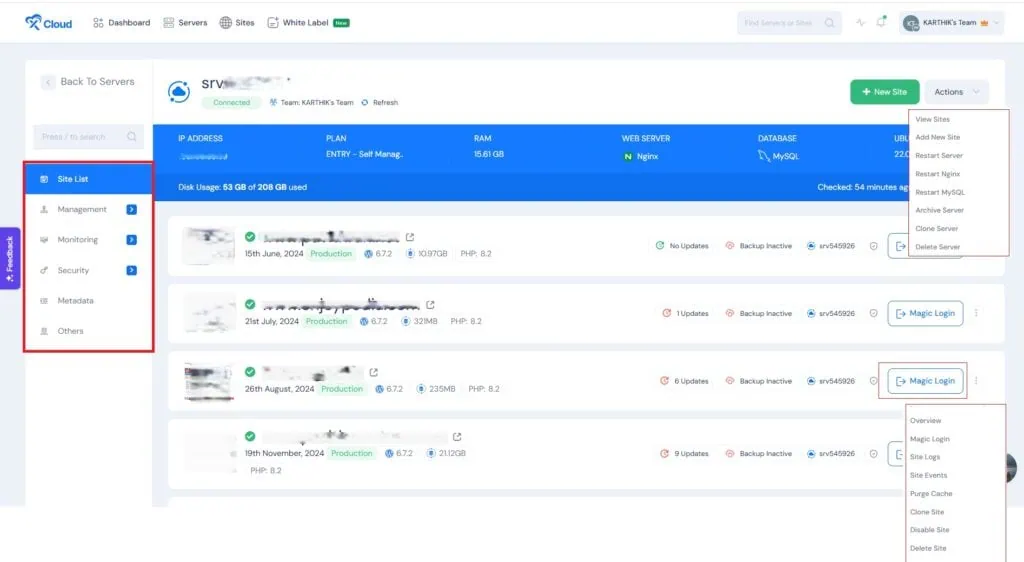
(Attached is a screenshot of the Server Settings page for reference.)
Server Settings Overview
On the left panel, you’ll find the Server-Level Navigation, which includes:
Site List
View all websites running on this server.
Server Management
Monitoring
Security
With these tools, xCloud makes it easy to manage, monitor, and secure your VPS hosting, giving you complete control over your websites and server settings.
Website Management in xCloud
The Sites section lists all the websites you’ve created, allowing you to:
Once you click on a specific website, you’ll enter its detailed settings page, where you can manage all aspects of your site’s configuration.
How to create a new site on xCloud
Setting up a new WordPress website in xCloud is incredibly simple. Just follow these steps:
Step 1: In the xCloud Dashboard, find the + New Site button at the top right corner.
Step 2: Select the server where you want to host your website.
Step 3: Currently, you can create:
- WordPress Website (Fastest setup)
- Custom PHP Website
- Manual Website Setup
🚀 Upcoming Feature: xCloud has announced that Laravel support will be added soon. Since most SaaS applications and AI-based web tools are built with Laravel, this update will be a game-changer for SaaS developers and PHP experts!
Step 4: Enter the required details, including:
- Domain Name
- Site Name
- DNS Setup
- SSL Certificate (for HTTPS security)
Step 5: Once you’ve filled in the necessary information, xCloud will automatically set up your WordPress site in just a few minutes!
xCloud make a video on how to create a Site on their Platform which make it easier for us to create a Website even comfortable and also speed up the process
Now, you’re ready to start building your website effortlessly with xCloud’s powerful hosting panel!
Website Migration & Setup
I know that many users looking for a VPS server are already running their online empire on another hosting platform and are searching for a seamless migration solution.
With xCloud’s built-in Migration Tool Plugin, moving websites becomes almost effortless. This tool simplifies the process, allowing you to:
✅ Migrate large websites without downtime
✅ Transfer all website files, databases, and configurations smoothly
✅ Ensure minimal disruption to your online presence
I personally used this migration tool to transfer my big websites, and it handled everything without issues. If you’re planning to switch to a VPS, xCloud makes migration hassle-free!
- Created a Staging Site on xCloud
- Before migrating, I set up a staging site on xCloud.
- If you’re installing a new WordPress website, you can directly add your domain name instead.
- Installed the Migration Tool Plugin
- xCloud provides a built-in Migration Tool Plugin that needs to be installed on:
- The staging site on xCloud
- The live website on Cloudways
- xCloud provides a built-in Migration Tool Plugin that needs to be installed on:
- Started the Migration Process
- Entered the Migration Key, and the migration process began automatically.
- The transfer was completed successfully without any issues.
- Updated Domain Name & Logged in with Magic Login
- After migration, I updated my domain name on xCloud.
- I then accessed my WordPress dashboard instantly using xCloud’s Magic Login feature (a one-click login to WordPress).
- Ensured SSL & Cloudflare Integration
- Verified that the SSL certificate was properly connected.
- For better security and performance, integrating Cloudflare is highly recommended.
With these simple steps, migrating my website to xCloud was quick and effortless!
xCloud make a dedicated video for Existing WordPress Website migration. Please follow the complete process and ensure accuracy at every step.
Site Settings Overview
Once you click on your Website. It takes you to the Site Settings where you can make site wise Changes by toggling a Left side navigation. We will discuss all Site Navigations one by one.
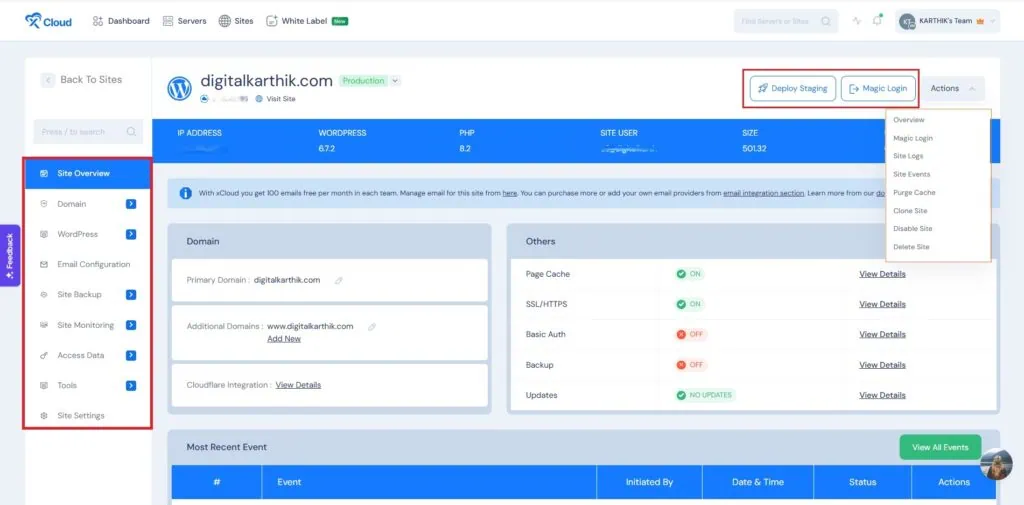
xCloud offers full control over your WordPress site right from its control panel. Here’s a breakdown of key features you can manage:
Domain & Cloudflare Integration
WordPress Management
Email Configuration
Site Backup & Security
Site Monitoring & Logs
Data Access
Tools
Site Settings
Those who hosts their Websites on unmanaged Hosting servers like Digitalocean, Vultr, etc can immediately connect your Server and start migrating your Website here for Free.
Security & Reliability
xCloud offers robust security features at both the server level and website level to protect your websites from malicious attacks and vulnerabilities.
Server-Level Security
Firewall Management: Manage SSH, HTTP, and HTTPS firewalls to control access and block threats.
Fail2Ban Management: Add IP addresses to block showing suspicious activity, such as multiple failed login attempts or those flagged as malicious by AbuseIPDB.
Vulnerability Checks: Scans all websites hosted on the server for suspicious code or plugins and provides alerts if any threats are detected.
Website-Level Security
7G Firewall: Protects your website from common web-based attacks.
AI Bot Blocker: Automatically detects and blocks malicious bots.
IP Whitelist/Blacklist: Manually allow or block specific IP addresses from accessing your website.
With these security measures, xCloud ensures your server and websites remain protected from potential cyber threats.
Enhancing Security with a Firewall Plugin
While xCloud provides server-level and website-level security, it’s always recommended to install a dedicated firewall plugin for added protection.
I personally use the Solid Security Plugin (Free Version) on all my websites. It provides:
By combining xCloud’s built-in security features with a solid firewall plugin, you can fortify your website and minimize security risks.
Cloudflare DNS Management & CDN
Yes! xCloud comes with built-in Cloudflare integration, making it easy to manage your DNS settings directly from the xCloud dashboard without manual configuration.
How to Integrate Cloudflare with xCloud
1. Go to xCloud Dashboard → My Profile → Integration → Cloudflare
2. Click New Cloudflare Integration
3. A popup window will appear asking for the following credentials:
- Cloudflare Integration Name
- Account Email
- API Token
- Global API Key
- Original CA Key
Once you enter these details correctly, xCloud will automatically sync with your Cloudflare account, handling DNS management seamlessly. This eliminates the need for manual DNS setup, saving time and effort.
👉 Click here for more details on Cloudflare integration
Does xCloud Offer Built-in CDN Integration?
No, xCloud does not provide a built-in CDN integration at the server level. Unlike some hosting providers that allow you to enable CDN for all websites on a server, xCloud requires you to set up CDN individually for each website.
If you need a CDN, you can integrate it directly on your website using Cloudflare, BunnyCDN, StackPath, or any other CDN provider of your choice. This gives you the flexibility to choose the best CDN solution that fits your website’s needs.
Hosting Multiple Websites & Clients
Can I host multiple websites on xCloud.Host?
xCloud offers flexible website installation limits based on whether you’re using their managed servers or connecting your own VPS.
- xCloud Managed Servers: If you purchase an xCloud-managed server, you can install unlimited websites—even on their Basic Newcomer plan (1GB RAM + 1 vCPU + 25GB SSD).
- Connecting Your Own Server: With the Free Plan, you can host up to 10 websites on your connected server. If you need to install more than 10 websites, you’ll need to upgrade to the Starter Plan ($5 per server/month), which allows up to 5 servers with unlimited websites.
This flexible pricing model makes xCloud a cost-effective solution for both individual bloggers and agencies managing multiple websites. Check Here for more In-Depth xCloud Pricing
Does xCloud.Host Support White-Label Hosting for Agencies?
Yes! xCloud offers a white-label solution, allowing agencies to start their own hosting business as resellers. With full control over branding, payment setup, and pricing, you can create custom hosting packages tailored to your clients’ needs.
Key features of xCloud’s white-label hosting include:
If you’re looking to launch your own reseller hosting business, xCloud provides all the necessary tools under one roof. 👉 Click here for more details and pricing
Can I Create Sub-Accounts for Clients or Team Members?
Yes! xCloud allows you to create sub-accounts for clients and team members, making it easy to delegate access while maintaining control. For more details, reach out to xCloud’s support team—they’ll guide you through the process and provide the best solution tailored to your needs.re details contact xCloud Support System. They will guide you to going through the process and reply with the perfect Answer to solve your doubts
Customer Support – Which One Helps You Faster?
The customer support at XCloud.Host has been extraordinary. While setting up my first server and website, I required some technical help. The support team was incredibly responsive and resolved my issues promptly, making the entire process stress-free
FAQs – Your Burning Questions Answered
After thoroughly testing xCloud, I can confidently say that it’s a strong alternative to Cloudways, especially for those who want more control over their VPS hosting at a lower cost.
While Cloudways is known for its ease of use and managed hosting services, xCloud offers more flexibility by allowing users to connect their own servers or purchase managed VPS hosting at competitive rates. Its intuitive control panel, built-in security features, and staging environment make website management effortless—even for non-technical users.
If you’re looking for a cost-effective, high-performance hosting solution that bridges the gap between self-managed and fully managed hosting, xCloud is definitely worth considering. Whether you’re a blogger, SaaS developer, or website designer, xCloud provides the resources and tools needed to scale your online presence efficiently.
So, is xCloud better than Cloudways? It depends on your needs, but if you value affordability, flexibility, and powerful server management features, xCloud might just be the better choice for you.
After nearly a year with XCloud.Host, I couldn’t be happier. Their exceptional customer support, seamless migration, and high-performance hosting solutions have made managing my WordPress website a breeze. If you’re looking for a reliable hosting solution, I highly recommend XCloud.Host.
Have you tried XCloud.Host or any other WordPress hosting solutions? Share your experiences in the comments below! Don’t forget to share this post if you found it helpful.

