Let me be real with you – editing videos, adding captions, trimming clips, inserting B-rolls… it all sounds cool until you’re actually doing it and realize it’s eating up your entire day.
As a content creator who juggles between making videos, writing blog posts, and managing websites, I’m always on the hunt for tools that make my life easier – and that’s when I found SubMagic AI.
At first, I thought it was just another AI tool. But once I gave it a shot, especially the free trial, I was genuinely surprised. This tool didn’t just slap captions on my video – it magically added animations, B-rolls, transitions, sound effects, and even removed silences and bad takes with just a few clicks. Crazy, right?
In this review, I’ll walk you through everything—what SubMagic is, who it’s for, how it works, the good stuff, the things I wish were better, and whether it’s really worth your money.
If you’re tired of wasting time in traditional editors and want your videos to look pro without all the hassle, keep reading. This might just be the tool you’ve been waiting for.
submagic ai
DK’s Rating:
SubMagic AI is an all-in-one AI-powered video editing tool built for creators who want to make short-form content faster and better. It adds animated captions, auto-generates viral clips, includes B-rolls, transitions, and sound effects—all in a few clicks. Whether you’re a YouTuber, Instagram creator, coach, or marketer, it saves hours of editing and helps your videos stand out without needing complex software.
Pros:
cons:
We earn a commission if you make a purchase, at no additional cost to you.
What is SubMagic & Who is It For?
Let me share a little secret with you. As someone who’s spent countless hours editing videos, adding captions, and trying to make content pop, I know how exhausting and time-consuming it can be. That’s when I stumbled upon SubMagic, and honestly, it felt like discovering a hidden gem.
So, What Exactly is SubMagic?
SubMagic is an AI-powered video editing tool designed to make your short-form videos—like TikToks, Instagram Reels, and YouTube Shorts—stand out effortlessly.
Imagine this: you upload your video, and in just a few clicks, SubMagic adds dynamic captions, relevant emojis, smooth transitions, and even background music. It’s like having a professional editor in your pocket!
Who Should Use SubMagic?
Now, you might be wondering, “Is this tool right for me?” If you fall into any of these categories, the answer is a resounding YES:
Content Creators & Influencers: Want to boost engagement and save time? SubMagic streamlines your editing process.
Marketers & Businesses: Looking to create compelling promotional videos without a hefty budget? SubMagic has got you covered.
Educators & Coaches: Need to produce informative content that keeps viewers hooked? The dynamic captions and visuals make learning fun.
Podcasters & Vloggers: Transform your audio content into captivating videos effortlessly.
Beginners: No prior editing experience? No problem! SubMagic’s intuitive interface makes it accessible to everyone.
Why I Love SubMagic
What truly sets SubMagic apart is its ability to make video editing feel less like a chore and more like a creative adventure. It saves me hours of work, and the end result? Professional-looking videos that resonate with my audience.
So, if you’re ready to elevate your content and connect with your viewers on a deeper level, give SubMagic a try. Trust me, it’s a game-changer.
My First Impressions (Unboxing SubMagic AI)
When I signed up for SubMagic’s free trial, they gave me 3 video uploads and 1 Magic Clip to test the tool and see how well it fits my workflow. I used those trials to check how smooth the process was, and honestly, once I saw how effortlessly it handled everything and delivered the results I wanted, I knew this tool was a solid time-saver. If it works for your use case and gets the job done without the usual hassle, I’d say go for the paid plan without a second thought. Check Here for Pricing➜
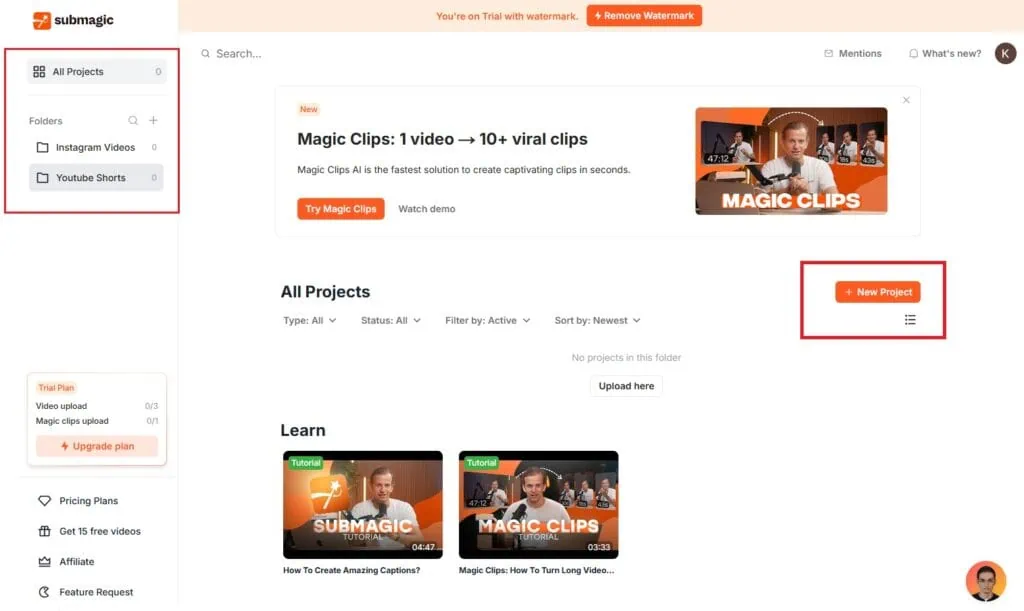
On the left side of the screen, you’ll see the “All Projects” section along with any folders you’ve created. Right now, I haven’t created a project yet, but I did make two folders: “Instagram Videos” and “YouTube Shorts” to stay organized.
In the main dashboard under All Projects, there’s a big “New Project” button. When you click on it, a popup appears with two options:

Here’s how it works:
As part of the free trial, SubMagic gives you:
It’s the perfect way to test both features and see which one fits your workflow best.
With the free trial account, your output videos will include a SubMagic watermark. To remove that watermark, you’ll need to upgrade to any of their paid plans.
Here’s what I suggest:
Start with the monthly plan and use it for a full month. If you find yourself using SubMagic regularly — and it truly saves you time and effort like it did for me — then switching to the annual plan next month is a smart move. You’ll get the same powerful features but save around 41% on billing annually. It’s a great deal if this tool becomes part of your weekly or daily workflow.
To help you get started with SubMagic, they’ve got a dedicated Help Center packed with everything you need — from step-by-step guides to beginner-friendly tutorials. You’ll also find helpful videos that walk you through all the features and functions.
What I really appreciate is that these videos are created by SubMagic’s co-founder, David himself. Yep, the founder! He takes the time to clearly explain how each part of the tool works in a way that’s super easy to follow, even if you’re just starting out.
That really says something. When the founder is not only building the product but also teaching you how to use it — you can tell he genuinely cares. It builds a lot of trust, and honestly, it makes me believe this tool is only going to get better and better over time.
Step-by-Step: How I Use SubMagic to Caption My Videos
Step 1: Upload the Video
I clicked on “Generate AI Captions” because I already had my short video ready — edited and all. The only thing missing? Those beautiful, animated captions that catch the eye and boost engagement. That’s all I needed.
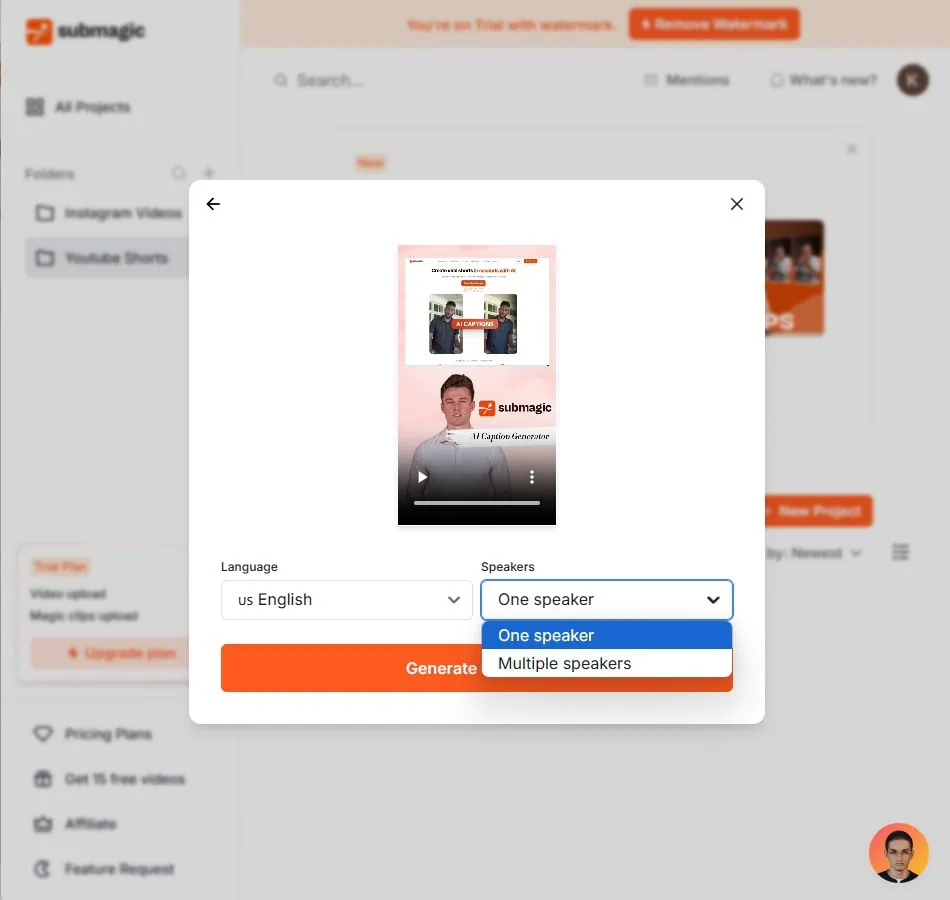
Once I uploaded the video, SubMagic asked me to select the video language. Since mine was in English, I didn’t have to make any changes. But here’s something cool — it supports 54 languages, including Tamil, which is my mother tongue! That got me excited. I’m definitely planning to create some videos in Tamil soon.
Next, it asked me to choose the speakers option — whether there’s just one person speaking or multiple voices in the video. This helps the AI understand the audio better and generate accurate transcripts and captions.
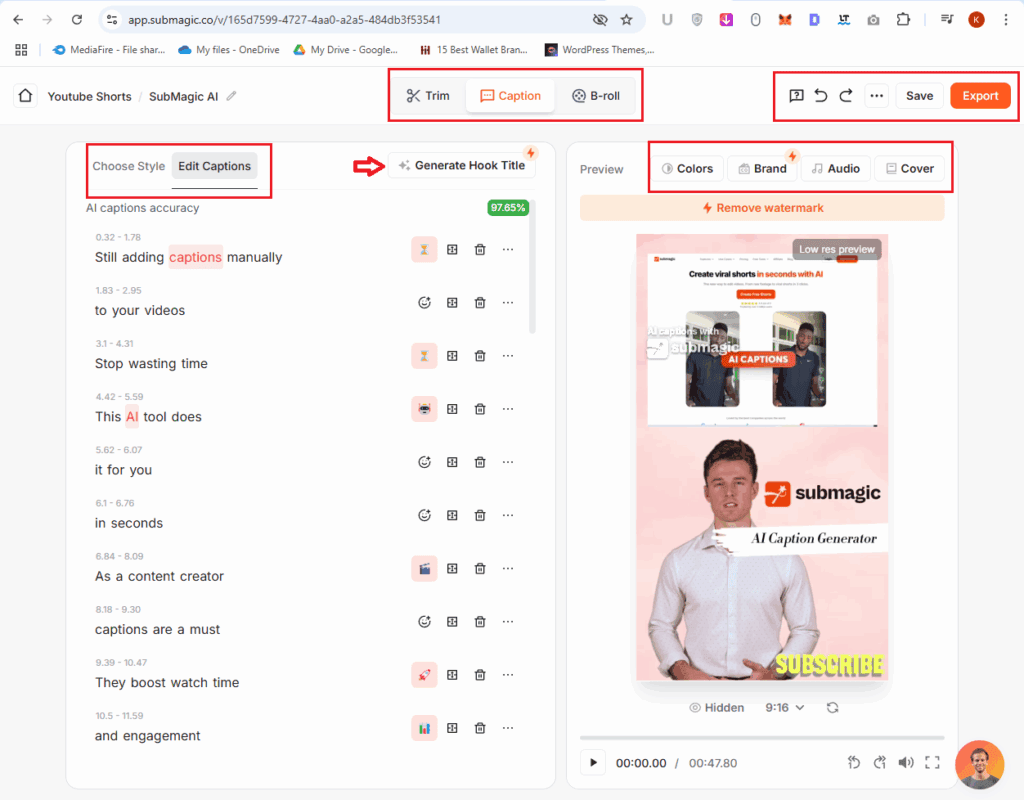
Step 2: Choose Style
This part got me excited!
SubMagic offers a bunch of pre-designed caption styles, including ones inspired by popular YouTubers. You don’t need to design anything from scratch — just click on the style you like, and boom 💥 — it’s instantly applied to your video.
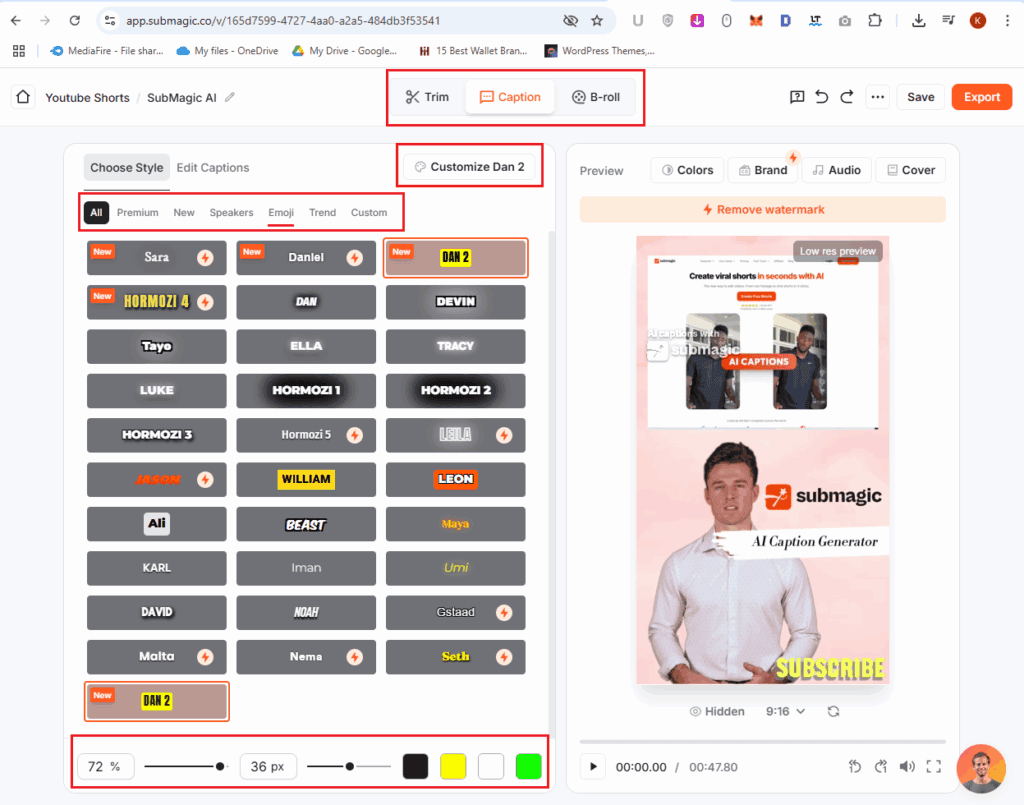
You can see the live caption preview on the right side of the screen, which makes it super easy to pick what looks best.
Under the “Choose Style” section, you’ll find filters like:
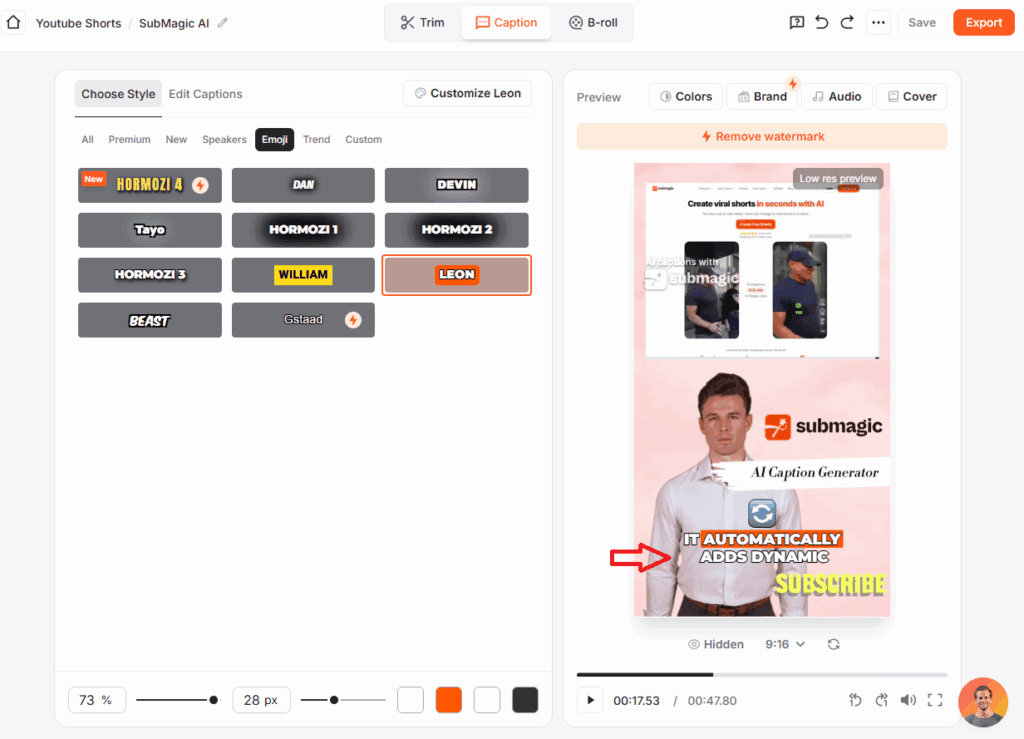
I selected the “Emoji” filter and picked the “Leon” style — which looks clean, fun, and super engaging with emojis. And just like that, the captions were added to my video automatically.
⚡ Honestly, doing this manually would’ve taken me at least 1–2 hours. But SubMagic made it happen in seconds.
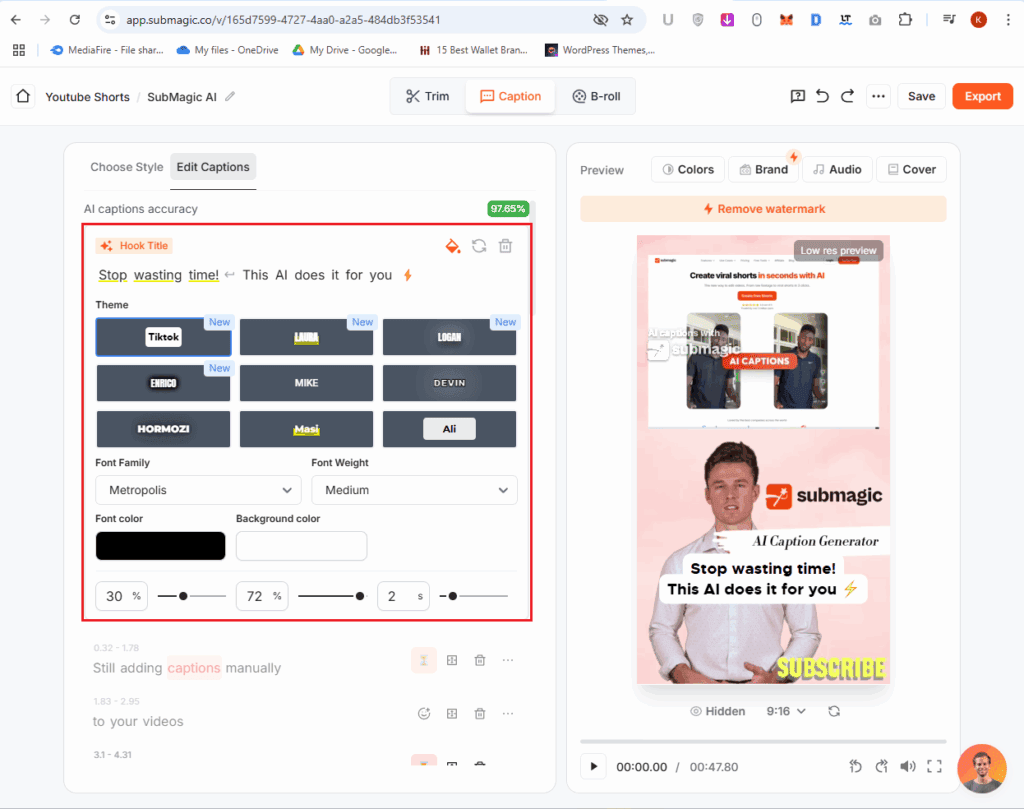
✏️ Bonus: Customize Your Style
You’re not stuck with the default styles either. If you want to tweak things, just click on “Customize Leon” (or whichever style you picked), and now you can fine-tune everything like:
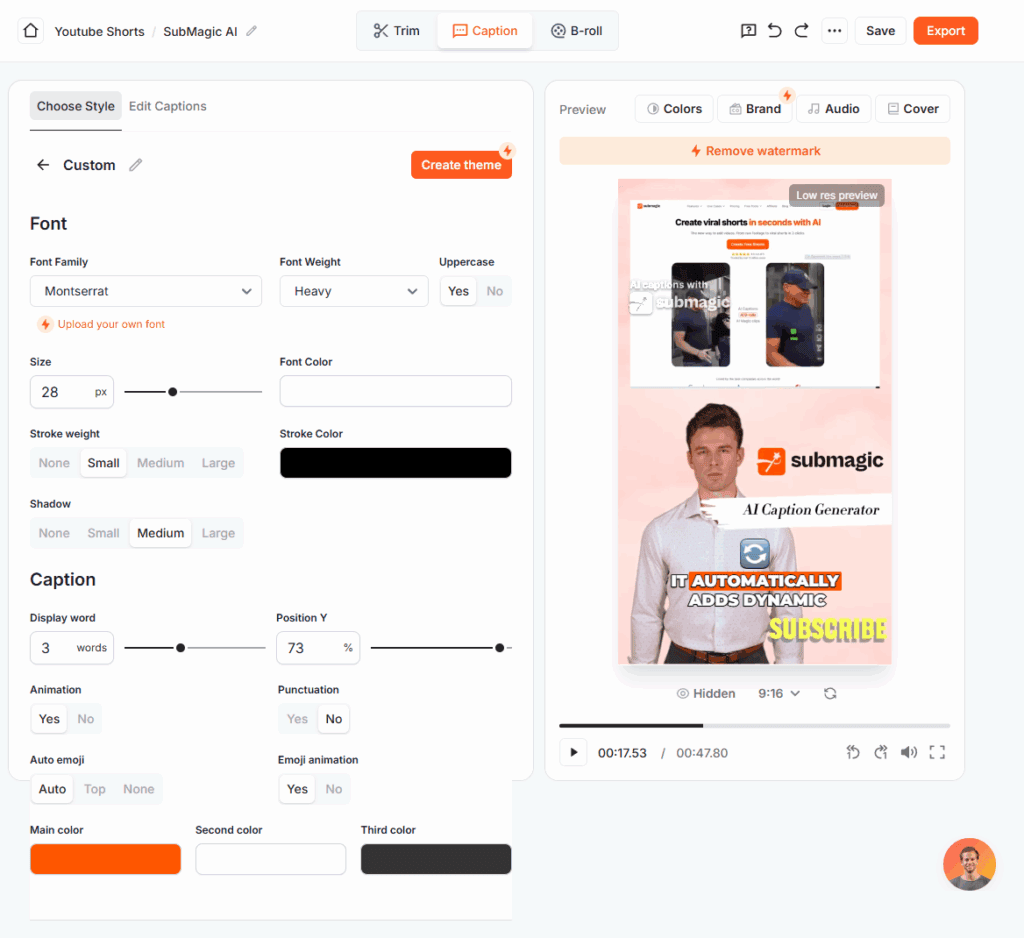
➤ Text Options:
➤ Caption Behavior:
There are tons of customization options, and the best part?
You can save your unique style as a theme so you can apply it to future videos with just one click. Huge time-saver!
Step 3: Edit Captions
Now it’s time to do a quick check and fix any errors or typos in your captions — or make some tweaks if you want to personalize them even more.
To start editing, just go to the top left corner and click on “Edit Captions” (you’ll need to switch from the “Choose Style” tab).
Once you’re inside, you’ll see your captions neatly divided into segments — each showing around 3 words per caption block, based on the setting you selected earlier under Style Customization.
Inside the Edit Captions panel, you can:
🔁 Just keep in mind: any change you make here only applies to that specific time segment — so it won’t affect the rest of the video.
Create Hook Title
At the top right corner, you’ll see a feature called “Generate Hook Title” — I’ve marked it in the image above for reference.
This tool auto-generates a catchy hook title based on your video’s content, and it adds that text to the very beginning of your video — specifically, it appears in the first caption segment, so it’s only visible for a few seconds right at the start.
This is super helpful for creating scroll-stopping intros, and you can even use this hook title frame as your default thumbnail on platforms like YouTube, Facebook, Instagram, and TikTok.
It’s a simple but smart way to get more clicks and make your video feel instantly professional.
Step 4: Adding B-rolls
Now that we’re done with the captions, it’s time to make the video even more engaging by adding stock videos and images — also known as B-rolls.
To do this, just switch from the “Captions” tab to the “B-roll” tab on the top bar.
Once you’re inside, you’ll notice that your video is automatically split into scenes. This makes it easy to place visuals at the right moments.
🤖 SubMagic AI – B-rolls Made Smart
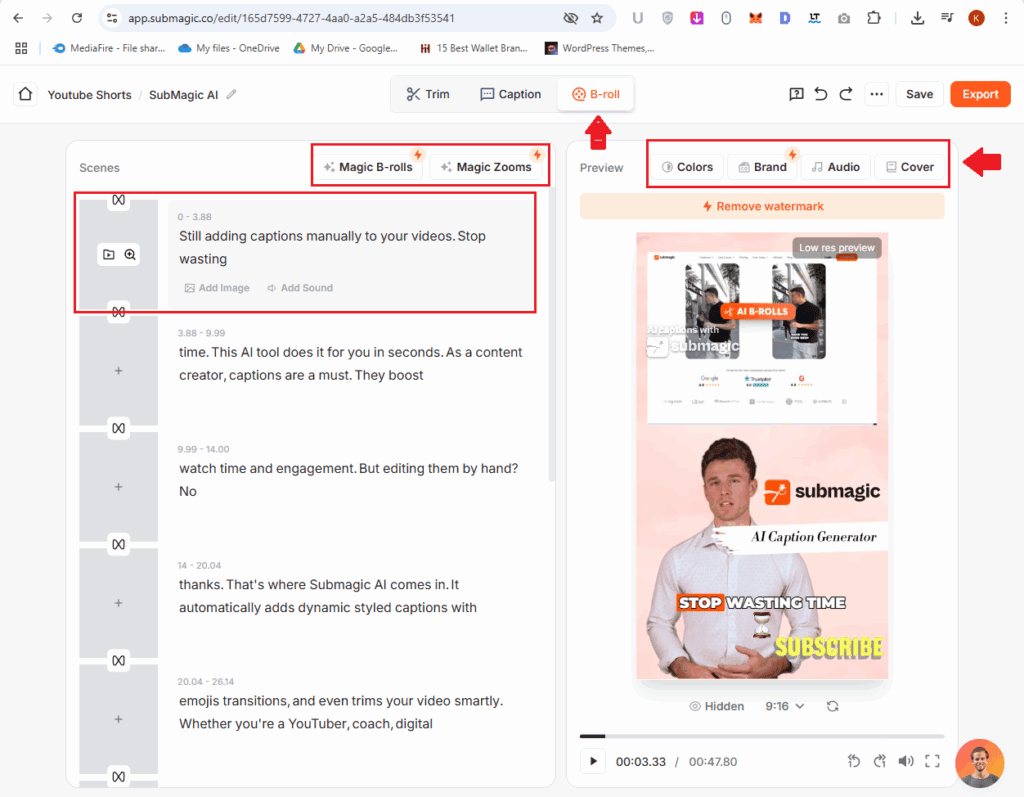
SubMagic gives you two really cool AI-powered tools here:
If you don’t like what the AI added, no worries — you can:
- ❌ Remove it
- 📥 Add your own clips
- 🎞️ Or choose from SubMagic’s built-in Media Library
Yes, you can upload your own B-rolls too if you have something specific in mind.
🔊 Add Sound Effects
You can even add sound effects to the end of each scene. These little audio touches instantly make your video feel more polished and professional — and they help create a stronger emotional connection with your viewers.
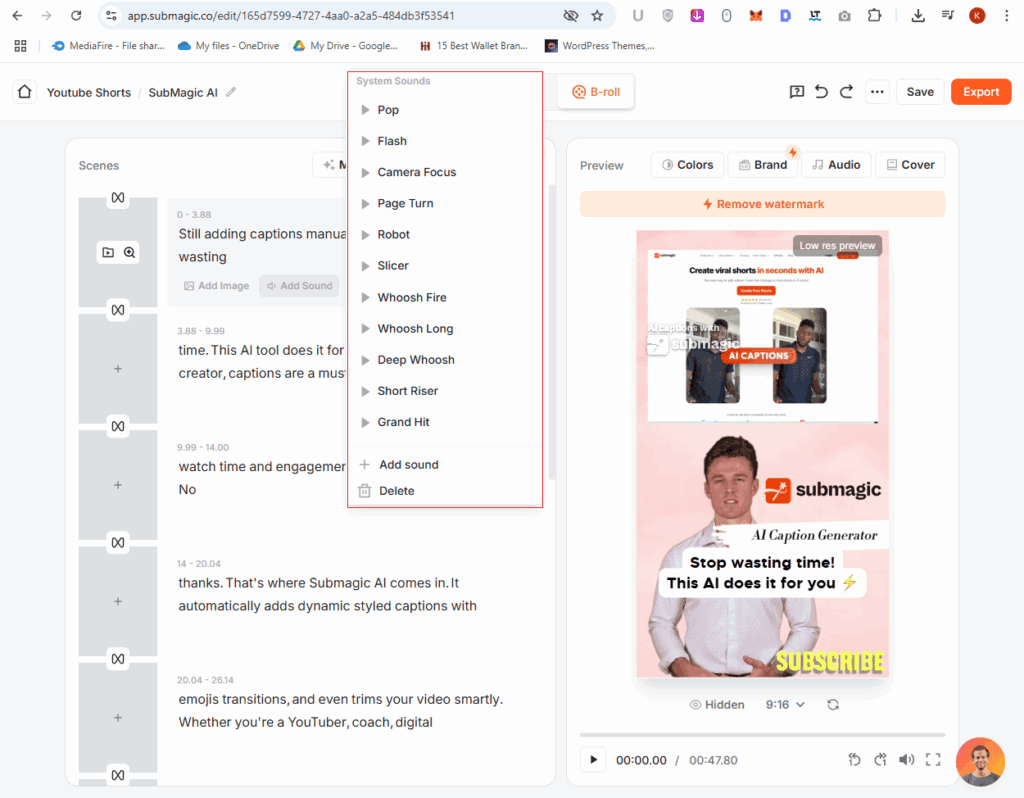
But with SubMagic, I just search the media library, click to add, adjust the timing, and done. What used to take me 30–60 minutes now takes less than 5 minutes, and the result looks even better.
My First Test with Magic B-Rolls: Here’s What Happened
Once I clicked on Magic B-rolls, I was honestly surprised — in a good way!
SubMagic’s AI didn’t just throw in some random clips. It added smooth transitions, 6 B-roll clips, and even sound effects — all done automatically. And the sound effects + transitions? 💯 They worked beautifully and gave my video a polished feel without any extra effort from my side.
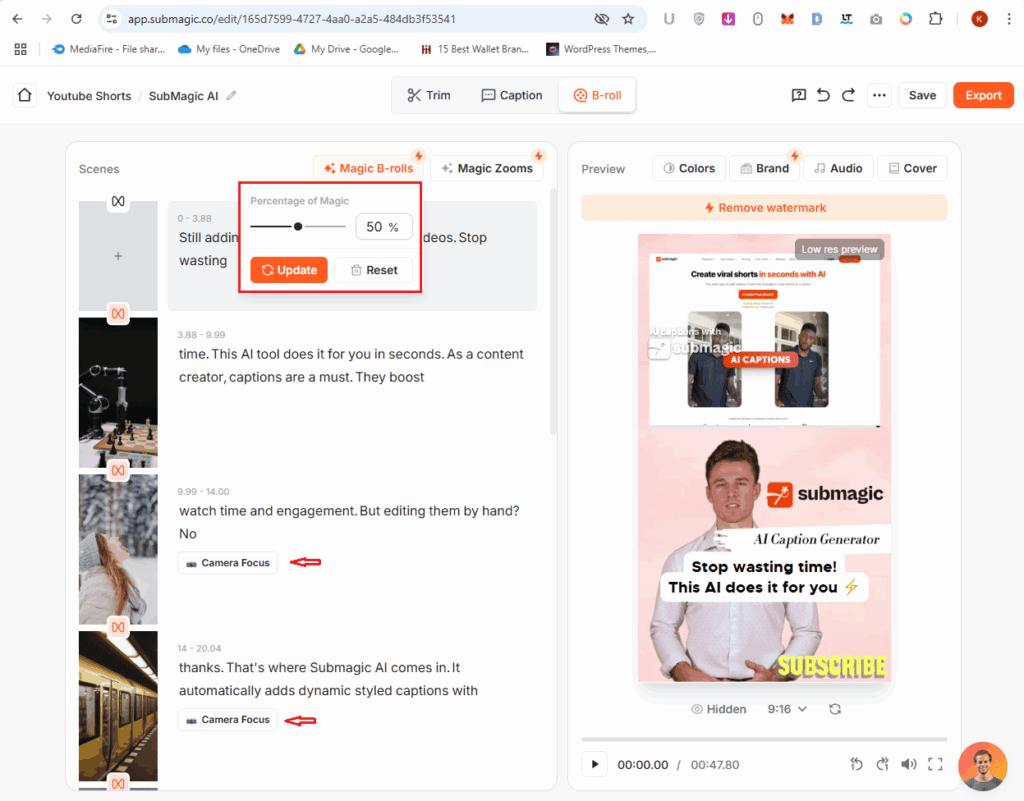
Out of the 6 B-rolls it added, 3 were spot-on for my content. The other 3 didn’t quite fit, so I simply removed them. That’s the good thing — you’re still in control. You can add your own clips from their media library by just typing the right keywords that match your video’s context.
Since I was creating a YouTube Shorts video, having 3 good B-rolls was more than enough. Adding more would’ve taken away focus from the main video, which actually carries the core message.
So yeah — for short-form content, this feature saves a ton of time and still lets your main footage shine.
Step 5: Trim the Video
Before this, I used to trim my videos using a separate video editor — in fact, I edited this one using CapCut. But now? I seriously think I can skip the video editor entirely for trimming, removing silences, and cutting bad takes.
SubMagic AI just made my workflow 10x faster.
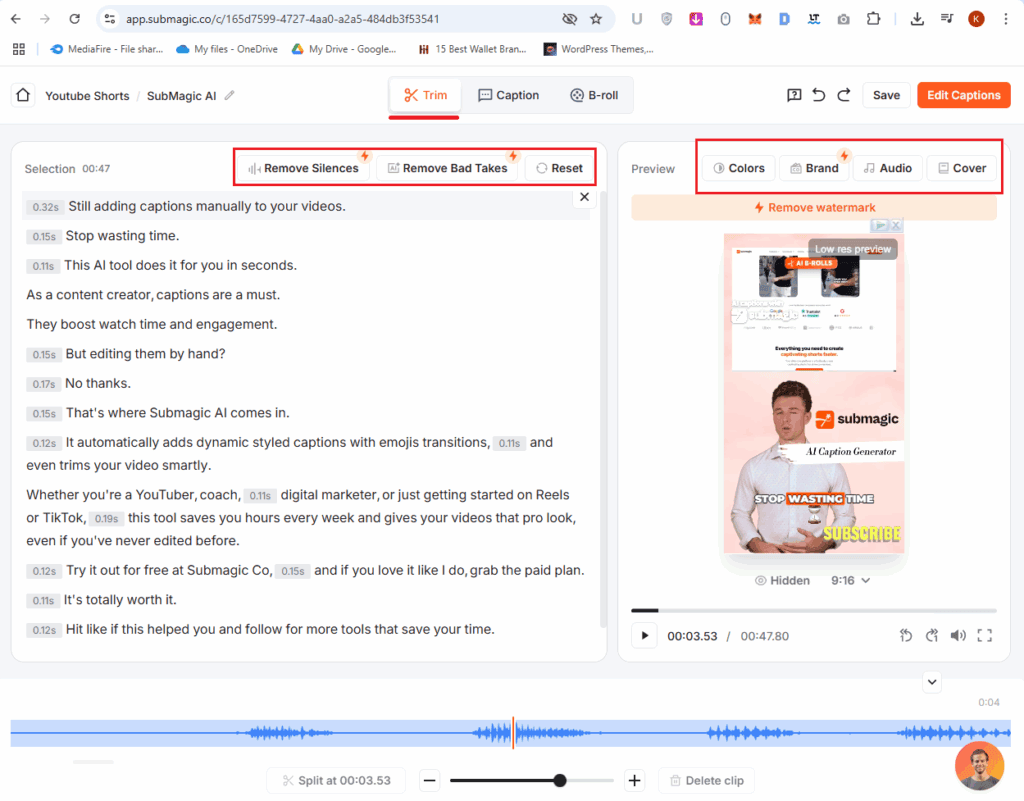
With its “Remove Silences” feature, it automatically cuts out all those awkward silent pauses — the ones I used to manually snip in the editor. And that’s not all. It also finds and removes bad takes using AI — spots where I fumbled or paused weirdly — and cuts them clean without me lifting a finger.
If you still want to manually remove a section, it’s super easy. Just go to that part of the video, where the caption appears, and click the little ‘X’ to delete that specific duration. Done.
Honestly, this Trim Video feature is a game-changer for me. Now I feel like I can go full god mode and take a video from raw footage to ready-to-publish in just minutes — all inside SubMagic, no video editor needed!
Final Touches Before Export – Let’s Polish It Up!
Alright, now we’re in the final stretch!
We’ve done all the heavy lifting — added animated captions, inserted B-rolls, sprinkled in transitions and sound effects… the video’s basically ready to go.
But before we hit Export, SubMagic gives us a few more customization options — and you’ll find them right above the video preview (check the screenshot I highlighted earlier for reference).
Here’s what you can tweak:
Colors
You can fine-tune your video’s look by adjusting:
This is perfect if your video looks a little dull or needs a more vibrant tone
Brand
Add your personal or business logo or just type in your brand name as text.
It’s great for keeping your content consistent and recognizable.
Audio
Want background music? You can:
Cover
Here’s where you can upload a custom video cover (aka thumbnail).
This will act as the default thumbnail when you publish on YouTube, Instagram, Facebook, or TikTok — super helpful for grabbing attention!
I love that SubMagic includes these final polish options without needing to leave the platform. It’s like having a mini finishing studio built right in.
Time to Export – Let’s Get That Final Video!
Once your video is fully edited and looking great, it’s time to export and get it ready to share with the world.
SubMagic gives you 3 quality options to choose from:
You can also pick your frame rate — either 30 FPS or 60 FPS, depending on the style you’re going for.
Once you’ve selected the settings that work best for your video, just hit that Export button. SubMagic will process your video, and in just a few minutes, your final video will be ready to download and publish.
SubMagic Support – Real Help When You Need It
I believe helping customers quickly is the real key to success in any business. And honestly, SubMagic is doing a great job here.
Throughout the entire video editing process, you’ll find a Support widget at the bottom-right of every page. Just click it, and you can chat directly with their support team.
They also offer a FAQ section and a Search bar, where you’ll find almost everything — from how-to guides to in-depth documentation on every feature SubMagic offers.
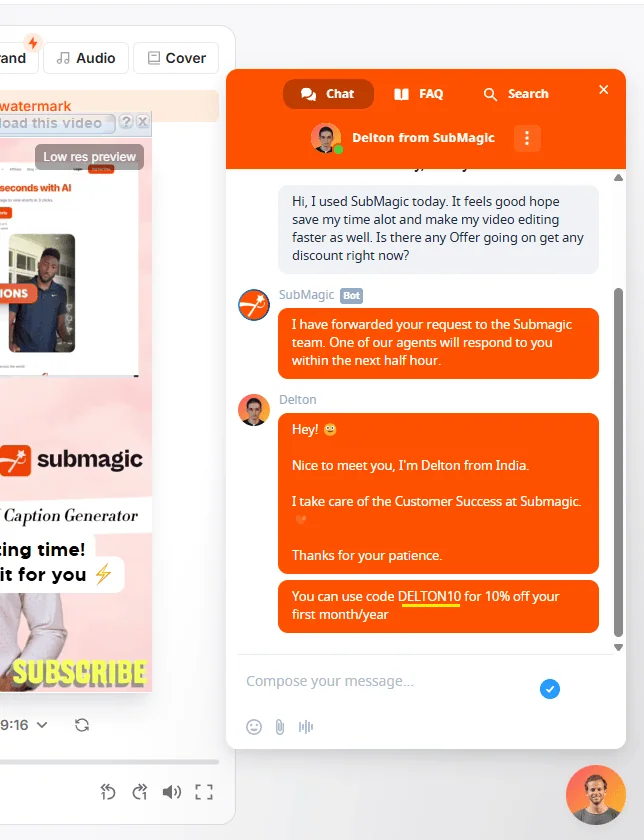
Within a few minutes, I got a helpful response from a support staff named Delton. Not only did he solve my query, but he also provided me with a 10% discount coupon 🧡 — and the best part? The coupon works for both Monthly and Yearly plans.
That shows they really care about creators and are ready to help you save while providing premium features.
Still got questions?
No worries. You can contact their support team and talk to a real human — usually within 30 minutes or less.
For example, I once reached out through the chat to ask about any available discounts. Their SubMagic AI bot responded instantly and let me know that an agent would reply shortly — and sure enough, I heard back from a real support person within half an hour.
Fast, helpful, and human — just how support should be.
SubMagic AI Pros and Cons
Alright, let’s break it down—because no tool is perfect, and I always like to weigh both sides before making a decision.
After using SubMagic AI personally, exploring every feature, testing its editing power, and even chatting with support, here’s what I loved—and what could be better.
Pros of SubMagic AI
- Super Time-Saving
No more spending hours in traditional video editors. SubMagic does it all in one place—captions, B-rolls, cuts, and more. - Beautiful Animated Captions with AI
It auto-generates subtitles with styles inspired by top creators. You can even add emojis, animations, and customize everything to match your brand. - Magic Clips & AI-Powered Highlights
Got a long video? SubMagic finds the most engaging parts and turns them into short, viral-ready clips in just a few clicks. - B-rolls & Sound Effects in Seconds
It automatically adds stock footage, transitions, zooms, and sound effects using AI. You can also manually tweak or add your own clips. - Supports 50+ Languages (Including Tamil ❤️)
Great for multilingual creators. I personally loved that it supports Tamil—my mother tongue! - No Need for External Tools
With trimming, captioning, effects, and export in HD—it’s pretty much an all-in-one video editor for short-form content. - Easy-to-Use UI
Everything is clean, intuitive, and web-based. Even if you’re a beginner, you won’t feel lost. - Responsive Customer Support
I got help within minutes, and they even shared a 10% discount coupon. That’s rare these days.
Cons of SubMagic AI
- Watermark on Free Plan
You can try it out, but the output videos come with a watermark. You’ll need a paid plan to remove it. - Pricing May Feel Costly Initially
The monthly plan might feel expensive, especially for new creators. But if you use it regularly, it pays off in time saved. - B-roll Accuracy Isn’t Always Perfect
While the AI does a great job most times, a few B-rolls didn’t match the context of my video. But hey, you can remove or replace them easily. - Limited Video Uploads on Free Plan
You get only 3 video uploads for AI captions and 1 Magic Clip during the trial. Enough to test, but not for heavy usage. - Needs Stable Internet
Since it’s a browser-based tool, editing speed depends a lot on your internet connection.
My Honest Take:
If you’re serious about short-form content—like YouTube Shorts, Instagram Reels, or TikToks—and you value speed, quality, and ease of use, then SubMagic is 100% worth trying. Just one good viral video can easily make up for the subscription cost.
SubMagic Pricing
Here’s a simplified comparison table of SubMagic AI pricing plans to help you understand everything at a glance:
|
Feature |
Starter ($12/mo) |
Professional ($23/mo) |
Business ($41/mo) |
|---|---|---|---|
|
Videos/Month |
15 |
40 |
Unlimited |
|
Max Video Length |
2 mins |
5 mins |
30 mins |
|
Export Quality |
1080p, 30 FPS |
1080p, 2K, 30 FPS |
1080p, 4K, 30/60 FPS |
|
Watermark |
Yes |
No |
No |
|
Caption Templates |
Standard |
Premium |
Premium |
|
B-Roll Access |
Basic |
Premium + Magic B-Rolls (add-on) |
Premium + Magic B-Rolls (add-on) |
|
AI Tools |
Basic Only |
All AI Tools Enabled |
All AI Tools Enabled |
|
– AI Hook Title |
|||
|
– AI Remove Silence/Bad Takes |
|||
|
– AI B-Rolls, Zoom, SFX |
|||
|
Customization (Fonts, Logos) |
Limited |
Unlimited |
|
|
Users |
1 |
3 |
Unlimited |
|
Support Priority |
|||
|
Add-On: Magic Clips |
+$12/mo |
+$12/mo |
+$12/mo |
Which Plan Should You Pick?
- Starter: Best if you’re just exploring. Great for testing with watermark-limited exports.
- Professional (Best Value): Ideal for solo creators and YouTubers who want watermark-free, high-quality short content with full AI features.
- Business: Perfect for agencies or teams who produce high-volume content and need full custom branding, longer video editing, and faster exports.
Which Plan Should You Go For?
Based on Submagic Pricing and analysing everything — using captions, emojis, B-rolls, hook titles, transitions, removing silences/bad takes, and aiming to make Shorts faster with automation:
✅ Go for the Professional Plan ($23/month) — It hits the sweet spot for features vs price.
I know the price might feel a bit high at first—but when you really look at the features, the insane time it saves, and how engaging it makes your videos, it’s honestly worth every penny. If you’re truly making the most of what SubMagic offers, then yes, go for the plan. It’s not just a tool—it’s a time-saver and content upgrade in one.
- You get all the smart AI tools, trending caption styles, emoji support, transitions, sound effects, and no watermark.
- It’s ideal for creators making up to 5-minute shorts and posting regularly.
- You can always upgrade to Business later if you need unlimited videos or 4K output.
Is It Worth It?
Yes, especially if you create content regularly. The Professional plan offers the best balance of features and affordability. You get advanced AI tools, no watermark, higher resolution exports, and more control — all at a price cheaper than hiring an editor.
Would you like a downloadable version of this table or want me to include recommendation highlights for your blog?
Final Thoughts: Is SubMagic Worth It?
After using SubMagic AI extensively, I can confidently say—it’s a game-changer for anyone creating short-form content.
If you’re like me, juggling between video editing software, caption tools, and stock footage sites just to get one short video ready… SubMagic really simplifies all of that. From animated captions, AI-based trimming, sound effects, to auto B-rolls—everything happens in one place. It literally saved me hours of editing time and removed the need for switching between multiple apps.
Even on the Free Trial, you get a solid taste of what’s possible. Sure, there’s a watermark, but you’ll see the real value before spending anything.
The Professional Plan is perfect for solo creators who want to publish 40+ videos/month and need advanced features without paying a fortune. And with a 10% discount code from support, even the monthly plan becomes more budget-friendly.
✨ If you’re serious about growing on platforms like YouTube Shorts, Instagram Reels, or TikTok, and want to edit fast with high-quality output, then yes—SubMagic is 100% worth it.
FAQs — Discover Answers That Transform Now
Submagic
4.9/5⭐
SubMagic AI is a powerful tool that auto-edits short videos with captions, B-rolls, and sound effects in minutes. Perfect for creators who want to save time and boost engagement without complex editing.
🔑Feature:
⚒️Ease of Use:
💰Pricing:
🤝Support: